As an Amazon Associate DcSoundOp earns from qualifying purchases.
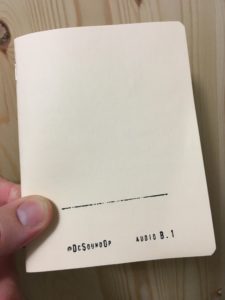
If you haven’t seen the video, the notebook is something I made to fill the gap that was left after I switched from using all paper notebooks to going all digital with Microsoft OneNote. I found myself bringing smaller notebooks for the times when you’re on the job, and need to make a quick list of inputs or outputs, a quick drawing of the setup, or just general notes about the day. I often find myself in these situations, and it’s not alway convenient or appropriate to continually pull out an phone or tablet to make notes.
After look back at how I have been using these smaller notebooks, I saw that I was continually making numbered lists of inputs and outputs, along with routing notes, stage plots and the odd phone number or general note about the job. I decided to make a really simple & thin notebook that would be easy to stick into a pocket and have on-hand when needed, with a page layout that would help me be more efficient in the field.
Click HERE to download the Adobe Ai File
I am offering these for sale in their current form, but I’d love to see what other folks can do with the idea, so I’m posting the Adobe Illustrator file for the current B.1 version notebook. If you change the template or make your own books, it would be great if you’d share the file back with the community so other folks can try out your design, too.
If you want to make your own books, you’ll need a few basic tools that you may already have on hand from other projects. I’m going to list everything I used here for these books, so if you’re starting from scratch, you’ll have everything you need.
- Paper – I wanted a heavier weight paper that could handle something like a Sharpie pen without too much bleed through, so I went for a 32Lb HP Premium Laserjet stock.
Cover Material – I was going for a simple look and wanted to be able to stamp my info onto the front, so I went for a 67Lb Vellum Bristol stock from Neenah – it’s important to consider the total weight of your cover and pages combined when it comes to cutting and stapling the finished product, I feel like much heavier than I went would be a real challenge.
Printing – I have had a Brother Network Laster printer for years now and they are absolutely the best deal for anyone who needs to print high quality stuff, but not very often. Unlike a lot of consumer inkjet printers, these will not dry up and clog if you don’t use them regularly.
Ink can be a considerable amount of the cost per unit if you’re making these in bulk. However tempting it is though, don’t skimp on the ink. Buy the factory ink replacement drums, the knock off’s might work well for a while, but the longevity isn’t close to being the same and sometimes they don’t work at all.
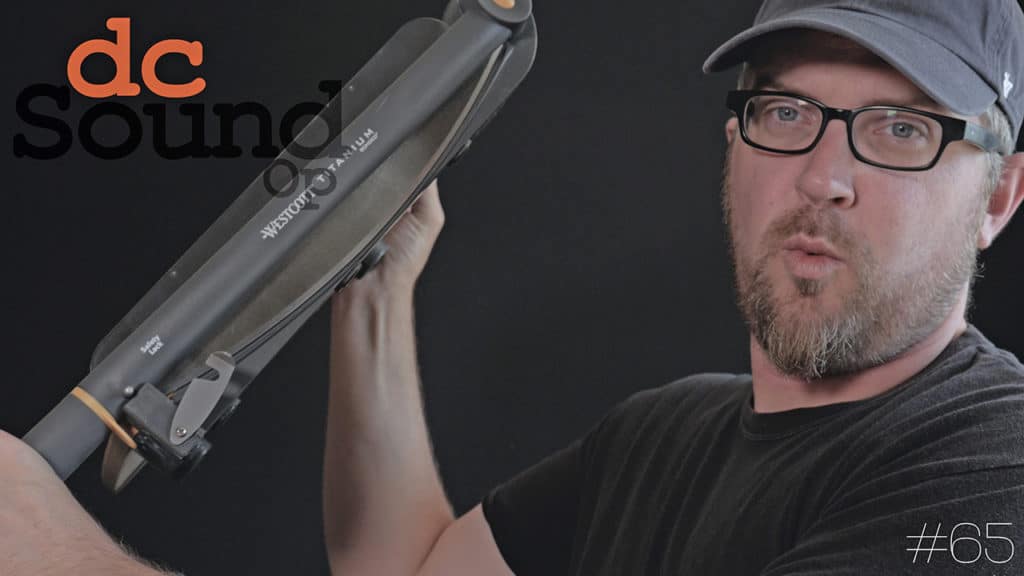
Cutting – I only had a crappy little craft cutter previously, so I picked up the Westcott 12″ Trim Air Titanium – I don’t have a terrific amount of experience with paper cutters, but of the dozen or so I’ve used in the past, this one is very good. Wicked sharp and the hand guard makes holding the pages in place nice and easy.
Binding – I wanted to keep cost down and simplicity up, so I went with a simple staple binding. It sounds simple, but even with this tiny book, a standard stapler just can’t reach in to get the middle of the fold. I picked up the Bostitch Booklet Stapler and it has made pretty easy work of getting the staples in the right spot. There is a bit of technique involved for sure, but it goes very fast once you’ve got the hang of it. I used these Bostitch Heavy Duty Staples.
Finishing – You can leave the corners uncut, but every-time you try to slide it into a pocket, it will bend the corners and give you trouble. There are many ways you could go about putting a radius on the corners, but for speed and consistency, I picked up a 5mm Radius Corner Punch
Stamp – You could print a logo on the covers I’m sure, or use any type of stamp that suits your style. I wanted something simple and quick that I could easily experiment with on the fly. I picked up one of these ExcelMark DIY Stamp Kits and it has worked out great for my needs.
That’s everything you need to get setup to make your own books. All told, it’s somewhere in the neighborhood of $150 if you do everything the way I did it.
![]()
Amazon and the Amazon logo are trademarks of Amazon.com, Inc, or its affiliates.