As an Amazon Associate DcSoundOp earns from qualifying purchases.
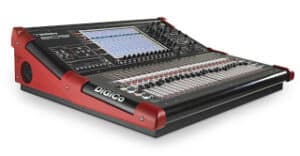
Getting called on Thursday for a Saturday night gig with an international touring act is always a nice way to fill in an otherwise slow week. Finding out that the venue is providing an SD9 for FOH (w/monitors from FOH) was also exciting, but out of all the digital console experience I have, this is one platform I had never before worked with. I’ve worked with almost every console made by Yamaha, I’ve had time on the SC48 and other Avid offerings, I’m up to speed with the iLive platform as well as the SoundCraft Vi6. With absolutely no exposure to anything DiGiCo, I figured I better get cracking on Friday after my gig, with some serious research to prepare for Saturday.
I jumped over to the DiGiCo website looking for the owners manual, found the SD9 and was immediately linked to a training area, featuring three whole series of videos! There is a Quick Start series, a Basic Operations series, and an Advanced Operations series. I spent a little over an hour going through all of these videos, in order, from the quick start guide all the way to the end of the advanced operations. Before starting the videos, I made a little checklist of important functions that I would want to be sure to investigate before the gig.
 My checklist included:
– Startup / Creating New Show / Configuring
– Aux, Bus & EFX Routing / Layout & Access to routing
– EFX editing, control / getting delay TAP onto macro button.
– Solo Bus – general routing & control
– Input patching / channel splitting / gain settings (on split channels)
– Output processing & EQ access
– Saving snapshots / Recalling snapshots etc.
A pretty simple list, covering all of the hot button issues when first learning a new OS on a digital console. To my surprise, everything I wanted to know was covered (at least briefly) in the tutorial videos. It felt more like a point by point walk through with an experienced house engineer, rather then a corporate tutorial video. I hadn’t even seen the console in real life yet and I was already impressed. Feeling more confident then I had expected, I headed out to the venue, carrying along some analog splits & short XLR cables, just incase I got stuck for time and had to do things the old fashioned way.
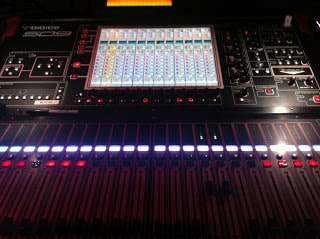
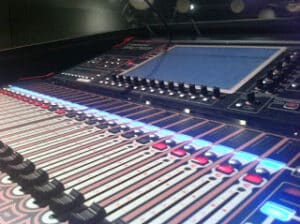
Turning the console on for the first time, everything looked familiar already, the late night cram session had paid off, and I felt comfortable with the controls immediately. The console layout seemed incredibly intuitive to me, I’m sure others prefer other workflows, but having the faders split the way the SD9 does lets you get a lot accomplished in the limited real estate of this desk. The “master screen” button brings you to everything else you need in a simple and obvious way, letting you leave the things that you are using most often (graphic EQ, solo bus controls etc) open on the home screen for easy access. I imagine that this layout is even better with an external monitor connected, but unfortunately one was not provided for this show. Getting used to the main screen menus took very little time, and the touch screen provided a nice tactile feel to the on-screen controls, making for more confident interactions with it on my part.
 I quickly set-up the input routing I needed, using the ALT input option to add a backup microphone to the lead vocal on CH1. I then assigned the same MAIN & ALT inputs to CH 2 to process that channel separately for the monitor mixes. I used the input gain control on CH1 and then used the digital trim on CH2 to get gains where I needed them. I’ll also add here that the console let’s you set an independent gain and digital trim for both the MAIN & ALT inputs, which was very handy here as the primary microphone was a wireless handheld and the backup was a wired SM58. The rest of the input routing went quickly, including getting the various EFX engines routed to Stereo return channels where I wanted them on the work surface. In a short amount of setup time, I was moving quickly around the console and ready for soundcheck with the artist.
Soundcheck went without a hitch, I already had the vocal channels prepped and ready in the singers monitors, had two mixes ready to go for the DJ and an additional IEM mix roughed in for the vocalist. We spent maybe 10 minutes going through a few songs just to get us all comfortable, making some fine adjustments to the mixes and EFX, but after that, we were all satisfied and wrapped it up. Getting the mixes dialed in was as smooth and easy as on any other console I’ve ever used, there was nothing that I needed to do that wasn’t readily available on the surface and laid out in a logical way. At this point I was feeling more comfortable on this console then on other digital consoles that I’ve spent huge amounts of time behind. Again, everybody’s idea of a good layout will differ, but the workflow and UI of this console just works for me, more so then any Digital console I’ve previously used.
 After soundcheck, I spent a few more minutes with the console before heading to dinner. Configuring the solo bus to default back to the lead singers IEM mix was accomplished in a few quick steps… saving and inserting a few new scenes for the performance was equally as simple, as was using the capture function to add different tasks to the macro buttons. I was also sure to take a snapshot of the console prior to doing any of my setup work, in doing this, I was able to return the console to the way I found it at the end of the night. This was extra important on this gig, as the house DJ began his set immediately as we finished, and I needed to recall his settings quickly to get him up and running without a change-over gap in the music.
The show got started and right away we settled into a comfortable mix, having a large Martin Audio sound system to work with, cover varying areas of the club, I knew that I’d need to double check my work in the various areas as they each filled up with concert goers. I took some time during the first two songs to get out of the FOH area and down onto the floor to see how the mix had changed since the crowd filled in the different spaces. Down on the main floor area in front of the stage, the mix sounded very close to what I was hearing at FOH. Perhaps it was a difference in the tracks that were being played or just the effect of my prior distance to the stage, but the top end of the mix felt a bit too harsh right down in front. It wasn’t so much the whole top end of the mix, just some stuff really biting from the tracks around 8kHz in the louder parts of the song.
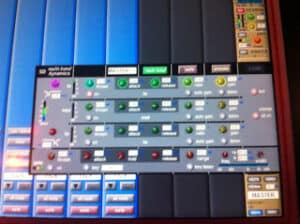 I returned to the SD9 to see what I could do to ease the hurt without ruining the mix. I quickly remembered the tutorial video that briefly touched upon the multi-band dynamics processor available on the master output bus. I quickly called it up, and was able to take advantage of some subtle compression on the top end of the mix. I used the one band of compression, set very light for the upper most 12kHz and above material… knocking just a few dB off at the heaviest moments. I then used another band set to control the 6-12kHz range, again set very lightly, just pulling it back a few dB when the tracks got really heavy in the high end, or the singer got overly hissy on her (S’s). Walking back out on the floor, this really made a subtle, but noticeable difference in the mix. When the energy picked up, the tracks tended to get a bit sharp and piercing, and this light compression on the top end allowed me to reign that in, while not puling back the whole energy of the otherwise well balanced track. Upon returning to walk the room, the mix had really come together quite well. I felt comfortable at this point with the translation between what I was hearing at mix position and what the audience was getting throughout the club.
 The remainder of the show was as easy as I could ever hope a show to go. My interactions with the console were comfortable for the rest of the evening, I felt confident in my movements and did not waste anytime hunting and searching for features buried in layers or menus. This console simply offers the features you are going to use most in well laid out hardware controls on the surface, you get graphical feedback of what you are doing on the screen whenever you manipulate a hard control, making the mixing process fluid and intuitive. With the console properly configured for your personal mixing style and the inputs / outputs organized to your liking on the fader banks, achieving a professional level of speed and accuracy on this console seemed easier then any other digital console I have had the pleasure of using. I am looking forward to using this console again in the future, and I will be seeking out opportunities to explore the rest of the DiGiCo console line as I can. The SD9 was a perfect fit for this one gig, but DiGiCo offers an entire range of consoles that each have their own strengths and specialities, namely in the routing options and larger In/Out configurations. I have a long run of a theater production coming up soon that I will be looking very hard at the rest of the DiGiCo line to meet my production needs.
![]()
Amazon and the Amazon logo are trademarks of Amazon.com, Inc, or its affiliates.